Canvas Transfer Quick Facts - Everything You Need to Know
Have you ever looked at your phone filled with hundreds of precious photos and wished you could display them in a more meaningful way? I know exactly how you feel! As someone who's spent years perfecting the art of canvas transfer, I can tell you there's nothing quite like seeing your favorite memories transformed into stunning wall art that will last for decades.
The global wall art market has exploded to R 1.2 trillion in 2025, with DIY home decor projects growing by an incredible 44% this year according to recent industry reports. Canvas transfer has become one of the most popular techniques because it's affordable, personal, and creates museum-quality results that rival expensive custom printing services.
What Is Canvas Transfer? The Magic Behind the Process
Canvas transfer is a fantastic technique that lets you move any photo directly onto canvas material using special transfer medium. Think of it like creating a tattoo for your canvas - except instead of ink, you're using your actual photo! The result looks just like professional gallery artwork, but at a fraction of the cost.
Pro Tip: Unlike traditional printing where ink sits on top of the canvas, transfer techniques actually bond your image into the canvas fibers. This creates a more authentic, textured artwork that ages beautifully over time.
The best part? You don't need any special artistic skills. I've taught complete beginners who created stunning pieces on their first try. The process works with any photo - family portraits, landscapes, vintage images, or even your pet's cutest moments!
Why Canvas Transfer Beats Other Photo Display Methods

After years of testing different photo display methods, I can confidently say canvas transfer offers unique advantages that regular photo printing simply can't match:
- Incredible Durability: Canvas is naturally resistant to fading, moisture, and wear. I've seen 20-year-old transfers that still look brand new.
- Rich, Deep Colors: The transfer process creates colors that are more vibrant and dimensional than standard prints.
- Authentic Texture: Unlike smooth photo paper, canvas adds beautiful texture that makes your art feel more expensive and gallery-worthy.
- Perfect Size Control: You can create any size from tiny 20cm x 25cm pieces to massive 122cm x 152cm statement walls.
- Budget-Friendly: Professional canvas printing can cost R 1,500+ for a 61cm x 91cm piece. DIY transfer costs under R 400 for the same size!
What really sets canvas transfer apart is the personal satisfaction of creating something with your own hands. There's something magical about watching your photo slowly appear on canvas as you work - it's almost meditative!
Materials and Preparation - Setting Yourself Up for Success
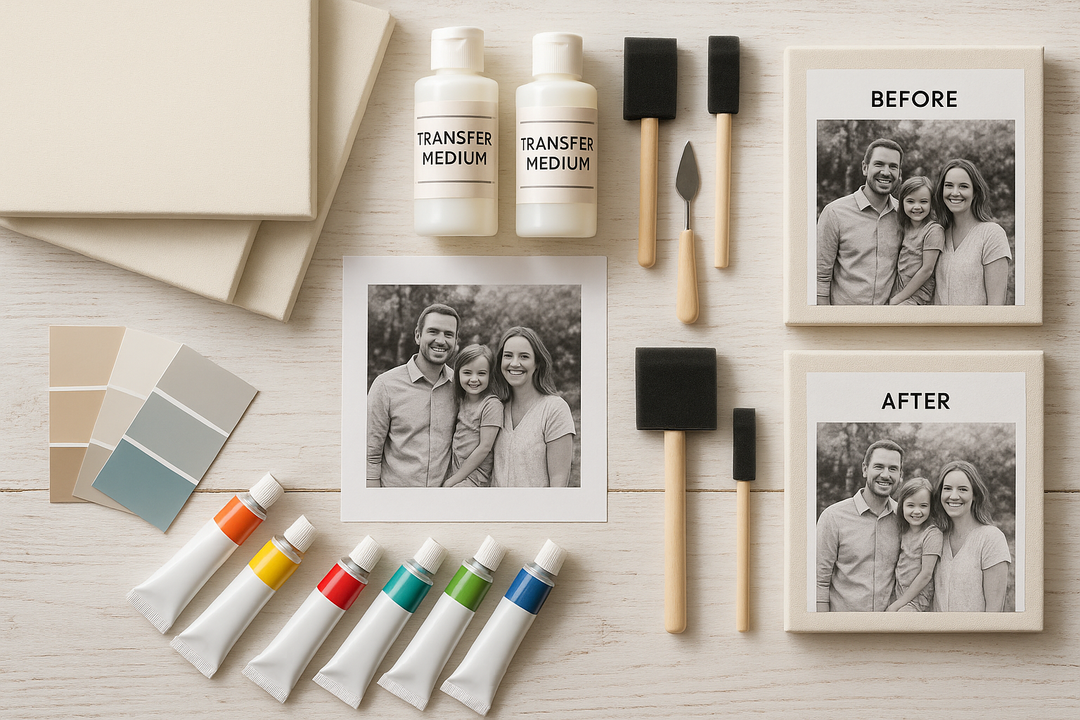
Complete Materials List & Cost Breakdown
Essential Materials (R 300-450)
- Canvas: 30cm x 40cm pre-stretched (R 45-65)
- Transfer Medium: Mod Podge Photo Transfer 236ml (R 85-120)
- Foam Brush: 5cm wide (R 25-35)
- Laser Photo Print: A4 size (R 15-25)
- Acrylic Paint: For touch-ups (R 45-65)
- Protective Sealer: Matte varnish (R 85-140)
Optional Upgrades (R 200-450)
- Heat Gun: For faster drying (R 180-250)
- Fine Detail Brushes: Set of 3 (R 65-85)
- Canvas Primer: For extra smooth finish (R 45-65)
- Professional Frame: Ready-made timber (R 180-350)
Choosing the Perfect Photo for Transfer
Not all photos work equally well for canvas transfer. After countless projects, I've learned exactly what makes a photo transfer beautifully:
Photo Selection Checklist
- Resolution: Minimum 300 DPI at your desired canvas size
- Contrast: Good difference between light and dark areas
- Focus: Sharp details, not blurry or pixelated
- Colors: Rich, saturated colors transfer better than pale washes
- Composition: Simple backgrounds work better than busy, cluttered scenes
Canvas Preparation - The Foundation of Great Results
Proper canvas preparation is absolutely crucial for professional-looking results. I've seen too many people skip this step and end up with patchy, uneven transfers. Here's my foolproof preparation method:
- 1Clean the Surface: Use a slightly damp cloth to remove any dust or oils from the canvas. Let it dry completely.
- 2Light Sanding: Very gently sand with 220-grit sandpaper to create slight texture for better adhesion.
- 3Prime (Optional): For ultra-smooth results, apply thin primer coat and let dry 2-4 hours.
- 4Final Clean: Remove all dust particles with a tack cloth or lint-free rag.
For professional canvas transfer techniques and printing methods, I highly recommend reading about 7 different canvas printing techniques to understand how transfer compares to other methods.
The Transfer Process - Step-by-Step Magic
Now comes the exciting part! I've refined this process through hundreds of transfers, and these exact steps will give you professional results every single time. Take your time - rushing is the biggest mistake beginners make.
The 5-Step Transfer Method
Step 1: Apply the Transfer Medium (15-20 minutes)
Pour a small amount of transfer medium onto your canvas. Using smooth, even strokes with your foam brush, spread it in a thin, consistent layer. The key is coverage without thickness - you should still see the canvas texture slightly through the medium.
Critical Tip: Work quickly but smoothly. The medium begins setting within 5-10 minutes in South African climate conditions.
Step 2: Position Your Photo (5 minutes)
Carefully place your laser-printed photo face-down onto the wet medium. Start from one edge and slowly lower it down to avoid air bubbles. Once it's positioned, DO NOT move it - you only get one chance!
Using a clean, dry brush or your hands, gently smooth from the center outward to remove any air bubbles. Apply firm, even pressure.
Step 3: The Waiting Game (24 Hours)
This is the hardest part - you must wait a full 24 hours for complete drying. I know it's tempting to check, but patience here makes the difference between amateur and professional results.
Place your canvas in a dust-free area at room temperature (18-24°C). Avoid direct sunlight or heat sources which can cause uneven drying.
Step 4: Remove the Paper (15-30 minutes)
After 24 hours, it's time for the big reveal! Dampen the paper backing with a spray bottle - don't soak it, just make it moist. Wait 2-3 minutes for the water to penetrate.
Starting from one corner, gently rub the paper with your finger in small circular motions. The paper will start to ball up and come away, revealing your transferred image underneath. Take your time with this step - rushing can damage your image.
Step 5: Finishing Touches (30-45 minutes)
Once all paper is removed, let your canvas dry completely (2-3 hours). You might notice some white areas where paper residue remains - this is normal! Use a slightly damp sponge to gently remove these bits.
For protection and a professional finish, apply a thin coat of matte or satin varnish using a clean brush. This seals your transfer and adds longevity.
Troubleshooting Common Problems
Problem #1: Patchy or Incomplete Transfer
Cause: Uneven medium application or insufficient pressure during placement.
Solution: Use longer brush strokes and apply consistent pressure when smoothing. For future transfers, practice your brushwork on scrap canvas first.
Problem #2: Paper Won't Come Off
Cause: Medium wasn't fully dry, or paper was over-wetted during removal.
Solution: Let it dry another 12 hours, then try again with less water. Work in smaller sections with minimal moisture.
Problem #3: Colors Look Faded
Cause: Poor quality printer ink or inkjet printing instead of laser printing.
Solution: Always use laser printing! Inkjet inks are water-based and don't transfer properly. Also boost your photo contrast by 10-15% before printing.
When you're ready to display your finished transfer, understanding proper framing techniques for different print types will help you choose the perfect frame to complement your new artwork.
Professional Finishing and Display Options
Your canvas transfer is beautiful on its own, but the right finishing touches can transform it from a DIY project into a museum-quality piece. At Stone & Gray, I work with our talented framers to offer several finishing options that complement transferred artwork perfectly.
Our sustainable Obeche timber frames work perfectly with canvas transfers. The 22mm profile and 35mm depth provide the perfect modern, contemporary look that doesn't overpower your personal artwork.
- White Timber: Perfect for bright, contemporary transfers
- Black Timber: Creates dramatic contrast with colorful transfers
- Natural Timber: Complements earthy, nature-themed transfers
- Honey Stained: Adds warmth to family portrait transfers
For more insights into canvas display options, explore the differences between gallery wrap and stretched canvas presentations to decide which style best suits your transferred artwork.
Explore Stone & Gray's Art Collections for Inspiration
While you're mastering canvas transfer techniques, browse our carefully curated collections for inspiration. Our canvas wall art collection showcases the kinds of professional results you can achieve with practice.
For those drawn to bold, expressive pieces, our abstract wall art prints demonstrate how color and composition work together. Many of these techniques can inspire your own photo selections and color adjustments before transfer.
Our contemporary wall art collection features clean, modern designs that pair beautifully with personal canvas transfers in gallery wall arrangements.
Canvas Transfer Statistics & Market Insights
- The global wall art market reached USD 63.61 billion in 2024 and is projected to grow at 8.55% CAGR through 2032. Source: https://www.fortunebusinessinsights.com/wall-art-market-105009
- DIY home decor projects surged 44% in 2025, with canvas transfer being among the top 5 most popular techniques. Source: https://id-times.com/cooking/diy-home-decor-projects-2025/
- 73% of people choose DIY projects to reduce expenses compared to hiring professionals or buying pre-made art. Source: https://id-times.com/cooking/diy-home-decor-projects-2025/
- The art materials market is valued at USD 3.14 billion in 2024, expected to reach USD 4.74 billion by 2033. Source: https://www.businessresearchinsights.com/market-reports/art-materials-market-102946
- Canvas-based artworks dominate the market due to their wide availability, affordability, and stylistic versatility. Source: https://www.fortunebusinessinsights.com/wall-art-market-105009
Your Canvas Transfer Journey Starts Today
Canvas transfer has become one of my favorite ways to help people create meaningful, personal art for their homes. There's something incredibly satisfying about transforming a digital photo into a tangible piece of art that will hang on your wall for years to come.
Remember, every expert was once a beginner. My first canvas transfer wasn't perfect - I had some patchy areas and the paper was stubborn to remove. But that's how we learn! Each project teaches you something new, and soon you'll be creating gallery-quality pieces that friends and family will admire.
Start Your First Project This Weekend!
Choose a special photo that makes you smile every time you see it. Gather your materials. Set aside 3-4 hours over two days. And most importantly, enjoy the process! There's magic in creating something beautiful with your own hands.
Share your finished canvas transfer with us - I'd love to see what you create!
As the DIY market continues to boom - with the global DIY home improvement market reaching USD 0.87 trillion in 2025 according to https://www.mordorintelligence.com/industry-reports/diy-home-improvement-market - techniques like canvas transfer are helping people create personalized, meaningful spaces without the designer price tag.
Whether you're creating a gallery wall of family memories, preserving precious vintage photos, or experimenting with artistic photography, canvas transfer gives you the tools to bring your vision to life. Happy creating!